Creating a simple setup
To get started using WiX in Visual Studio, you can create a new WiX project in the Visual Studio IDE by using the following steps:
- Click File, then click New, then click Project...
- Choose the WiX node in the Project types tree, then select WiX Project, and name your project "MySetup" as depicted in Figure 1.

Figure 1. Create a new WiX project
This will create a new solution with the MySetup project and a MySetup.wxs file. The MySetup.wxs file requires some additional information before it will compile successfully. So let's take a moment to look at the MySetup.wxs file and discuss what needs to be done to it in order to be able to build an MSI.
A First Look at the Default MySetup.wxs File
The MySetup.wxs file contains the beginning of the setup code for the project. Everything needed to create an MSI can be added to this file. To begin with, let's look at the default contents provided in MySetup.wxs.
Note: If you are not familiar with Windows Installer setup packages, you are strongly encouraged to review the MSDN documentation about the Installation Package before continuing. It will provide a lot of valuable context as we dig into the details of a Windows Installer setup package.
    <?xml version="1.0" encoding="UTF-8"?>
    <Wix xmlns="http://schemas.microsoft.com/wix/2006/wi">
      <Product Id="677a7ac3-6e9b-4531-8a61-c31acc301d27" Name="MySetup" Language="1033"
               Version="1.0.0.0" Manufacturer="MySetup" UpgradeCode="ae949a2b-1fcd-4abe-bf47-1eb923575de1">

        <Package InstallerVersion="200" Compressed="yes" />

        <Media Id="1" Cabinet="MySetup.cab" EmbedCab="yes" />

        <Directory Id="TARGETDIR" Name="SourceDir">
          <Directory Id="ProgramFilesFolder">
            <Directory Id="INSTALLLOCATION" Name="MySetup">
                <!-- TODO: Remove the comments around this Component element and the ComponentRef below in order to add resources to this installer. -->
                <!-- <Component Id="ProductComponent" Guid="78576f70-ac55-4d9c-b9e8-a96d81889ada"> -->
                        <!-- TODO: Insert files, registry keys, and other resources here. -->
                <!-- </Component> -->
            </Directory>
          </Directory>
        </Directory>

        <Feature Id="ProductFeature" Title="PUT-FEATURE-TITLE-HERE" Level="1">
          <ComponentRef Id="ProductComponent" />
        </Feature>
      </Product>
    </Wix>
If you are familiar with the Windows Installer, the structure of the MySetup.wxs file should be familiar. First, the Wix element exists purely to wrap the rest of the content in the file. The Wix element also specifies the namespace, the xmlns attribute that enables validation during compile and auto-complete in Visual Studio via IntelliSense. Next, the Product element defines the required Windows Installer properties used to identify the product, such as the ProductCode, ProductName, ProductLanguage, and ProductVersion. Third, the Package element contains the attributes for the Summary Information Stream that provides information about the setup package itself. The rest of the elements, except the ComponentRef element, map to Windows Installer tables by the same name, for example the Media table, Directory table, Component table, and Feature table. The ComponentRef element is used to tie the Features to their Components which maps to the entries in the FeatureComponents table.
Building the MySetup.wxs File
The default MySetup.wxs that is generated when you create a new WiX project will generates a build warning. In the Output window, you may see this warning:
The cabinet 'InstallPackage.cab' does not contain any files. If this installation contains no files, this warning can likely be safely ignored. Otherwise, please add files to the cabinet or remove it.
Because the WiX project does not yet reference an application, there is nothing to install. Nevertheless, an installation package named InstallPackage.msi was built in the bin/Debug folder, together with a file that is named InstallPackage.wixpdb, which contains debugging information. Running the InstallPackage.msi at this point does almost nothing.
Doing Something Useful with MySetup.wxs
Now let's do something useful and add an application to our solution. For this example, we will create a C# Windows Forms Application, but you can use whatever programming language you prefer.
- Click File, then select New, then select Project.
- Choose the Visual C# node in the Project Types tree, then select Windows Forms Application.
- Name your application "MyApplication".
- Be sure to choose the Add to Solution option in the Solution drop-down as depicted in Figure 2.
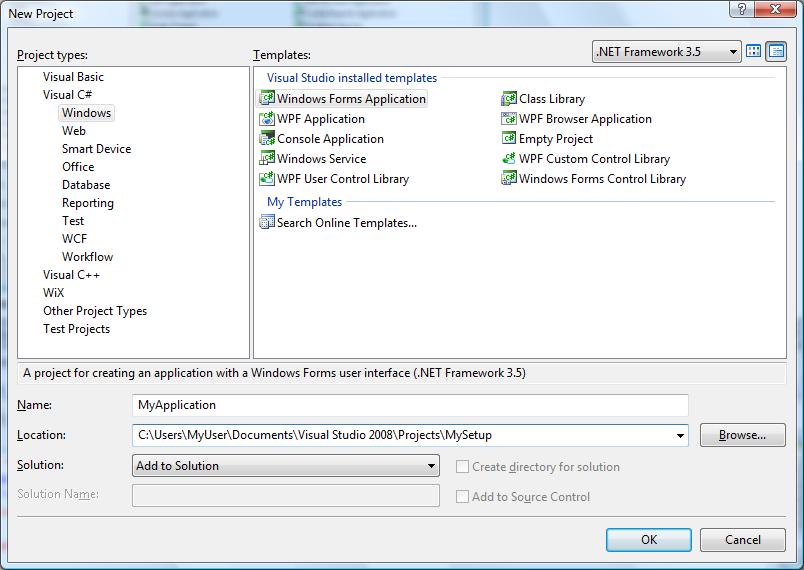
Figure 2. Creating MyApplication project in the solution
We need to make sure that the MyApplication project is built before the MySetup project because we will use the output from the MyApplication project build as an input into the setup build. For the purposes of this example, it does not matter what the application does, so we will not change the generated application code. No matter what the application does, we need to get it to install via setup, so let’s return to the MySetup project and the MySetup.wxs file to add this new application. While we are there, let's add a shortcut to the application to the installer. To create the appropriate project dependencies, right-click on the References node under the MySetup project and choose Add Reference.... In that dialog, choose the Projects tab, click on the MyApplication project, and click the Add button as depicted in Figure 3.

Figure 3. MySetup project references the output of the MyApplication project
Now we need to get this application to install via setup, so let’s return to the MySetup project and the MySetup.wxs file to add this new application.
Open MySetup.wxs and you will see a comment that says:
<!-- TODO: Insert your files, registry keys, and other resources here. -->
Delete this line and replace it with the following lines of code:
    <File Id="MyApplicationFile" Name="$(var.MyApplication.TargetFileName)" Source="$(var.MyApplication.TargetPath)"
          DiskId="1" KeyPath="yes" />
Note: If you type that code into the editor (instead of copying and pasting from this example) you will notice that IntelliSense picks up the valid elements and attributes. IntelliSense with WiX in Visual Studio can save you significant amounts of typing and time when searching for the name of the elements or attributes as you become more comfortable with the WiX language.
That line of code instructs the WiX toolset to add a file resource to the setup package using "MyApplicationFile" as its package identifier. The Name attribute specifies the name for your file when it is installed and the Source attribute specifies where to find the file for packaging during the build. Rather than hard-code values for these attributes into our source code, we use the WiX preprocessor variables that are passed to the WiX compiler. More information about using preprocessor variables, including a table of all supported values, can be found in the Adding Project References topic.
The DiskId attribute instructs the WiX toolset to add this file to the Media element with matching Id attribute. In this example, the MyApplication executable is added to the MySetup.cab cabinet and that cabinet is embedded in the setup package. The KeyPath attribute instructs the WiX toolset to use this file as the key path for the component that contains the file.
Before building the solution again, we need to make sure that the MyApplication project is built before the MySetup project because the output from the MyApplication project build is an input into the setup build. To create the appropriate project dependencies, right-click on the References node under the MySetup project and choose Add Reference.... In that dialog, choose the Projects tab, click on the MyApplication project, click the Add button, and click Ok.
Rebuilding with these changes will create a setup package that can install and uninstall your application.